*This post may contain affiliate links for which I earn commissions.*
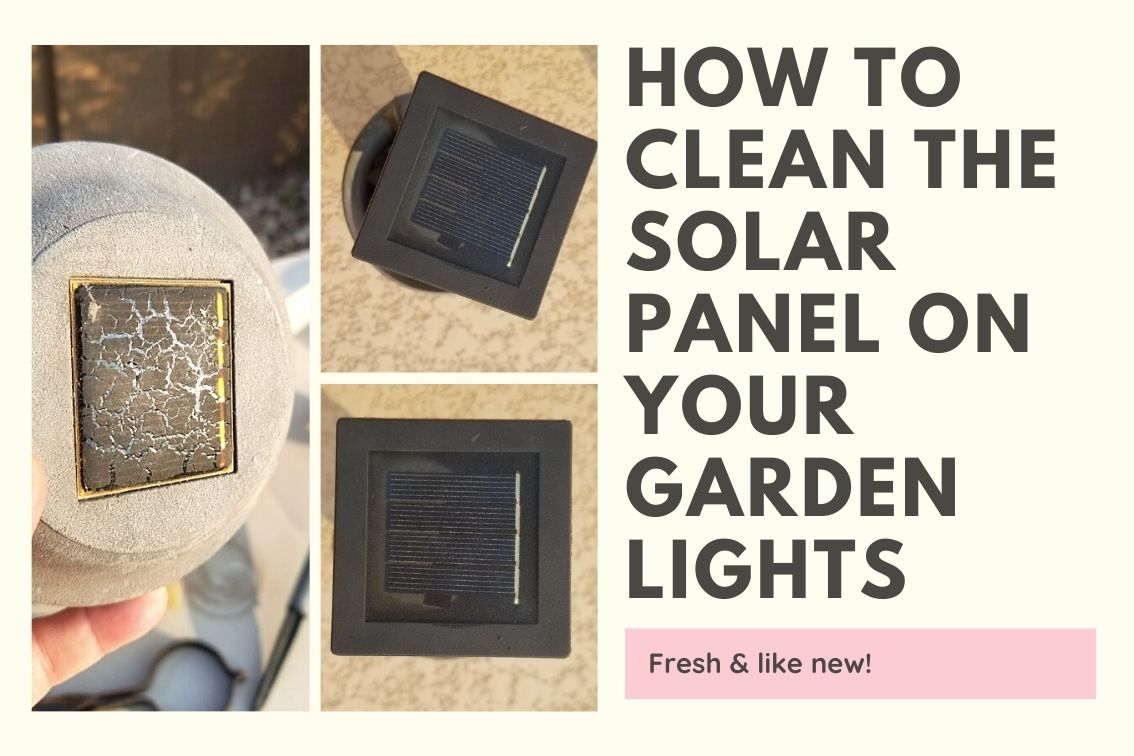
We get so much sun where we live that we have several sets in our yard but that sun is also incredibly brutal on the film, frame and glass cover that protects the photovoltaic cells.
After a while they start to look really faded, the tops get cloudy, and the film can crack making them look ugly.
Not only do they not look as nice but you may find that your lights no longer run as long as they once did.
That's because the sun now has a harder time reaching the cells. Less sun getting through means less energy stored by the battery.
Rather than replace them - which can run anywhere from $30-60 per set - I wanted to see if I could restore the ones I had by fixing the damage and cleaning them up.
The steps in this video seemed pretty simple, were easy to follow, and very thorough.
Cleaning Supplies
Rust-Oleum Painter's Touch 2X Ultra Cover Clear Gloss Spray CanIsopropyl Alcohol
Spray bottle of water
400 grit wet/dry sandpaper
2000 grit wet/dry sandpaper
Painter's tape
Piece of cardboard larger than the head of your solar light
Dish soap
Kitchen sponge
Dry cloth
Paper towel
Scissors
Pencil or pen
Ruler
Drop cloth
Follow These Steps
1. Remove the top of your solar light - this is usually a cap that has the battery stored inside and the bulb underneath.2. Mix dish soap and water
3. Dip your sponge into the soapy water and then squeeze out any excess so you don't risk water dripping into the battery compartment
4. Once you've cleaned off any dirt and grime, dry the cap with a clean cloth
5. Wash the glass or plastic part of your light and dry it (the part to which the cap attaches - this will help your light shine more brightly when you're done)
6. Use the painter's tape to surround the solar panel
7. Tear off a small piece of 400 grit sandpaper and a small piece of 2000 grit sandpaper
8. Spray the solar panel and both pieces of sandpaper with water and keep the spray bottle handy so you can continue to spray the solar panel while you work - don't let it or the sandpaper become too dry
9. Use the 400 grit sandpaper with light pressure to get rid of the dirt on the solar panel
10. Use the spray bottle to rinse off the solar panel
11. Use the 2000 grit sandpaper with light pressure to smooth the surface of the solar panel
12. Apply isopropyl alcohol to a clean cloth and rub it over the surface of the solar panel
13. Measure the size of the solar panel and cut the shape into the center of your piece of cardboard
14. Place the head of the solar light on a drop cloth outside or in a ventilated area with the solar panel facing up
15. Lay the cardboard over the head so the solar panel shows through the cut out
16. Spray the clear gloss over the solar panel and wait for it to dry
17. Spray a second coat of clear gloss over the solar panel and wait for it to dry
18. Reassemble your solar light
If, like me, you have a full set of lights to clean you want to make sure you have a big enough drop cloth to work on all the caps one after the other.
I put them in a line and just moved my cardboard down the row as I glossed over each solar panel.
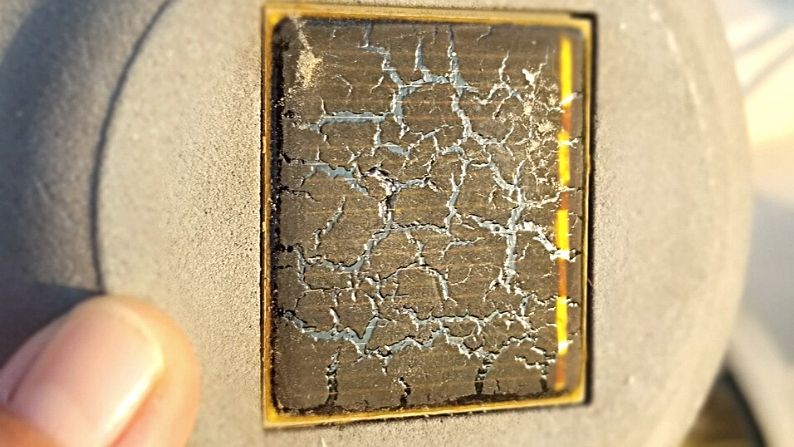
They can look as good as they did brand new after following these steps:
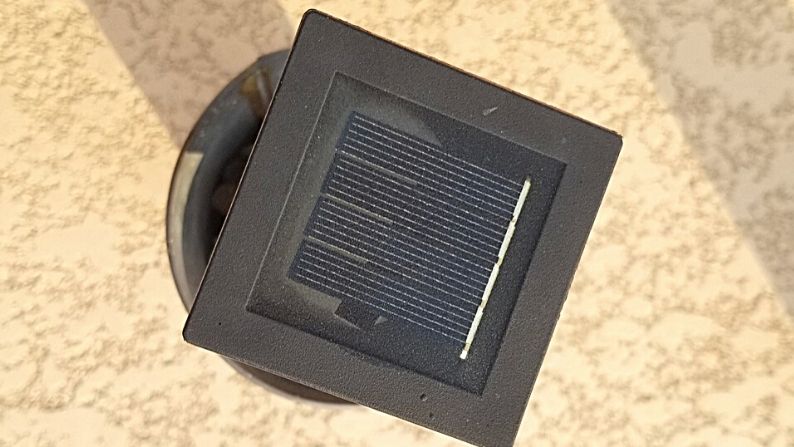
These steps shouldn't take too long and don't require any previous experience.
If you have plastic heads and bases you can use something like this hammered copper spray paint to change the color and then coat them twice with the clear gloss.
Actually, that's going to be a future project on my to-do list. Mine were initially black but have faded to a light grey and I'd rather change to something that better blends with the brown tones and accents in our backyard.
With your lights all clean and sparkly again, follow my steps for getting them to stay upright all the time when you put them back outside.